How to Make a Reel from Photos and Videos Online
By Modisign
- Published
- Updated
- Last tested
You can make a Reel from photos and video clips in one Studio timeline: import your files, add them in order, choose 9:16, then adjust each photo’s duration and framing before exporting an MP4. Studio requires a free Google sign-in and keeps your media in the browser. Photos have no sound of their own, so check the audio gaps as carefully as the pictures.
What does a mixed photo-and-video Reel look like?
Our desktop test used a wide café photo, a six-second portrait sample clip and a portrait home-office photo. The pictures show AI-generated fictional creators; the sample clip was made from a still illustration with test audio. These are local test files, not supplied footage or a recorded creator’s Reel.
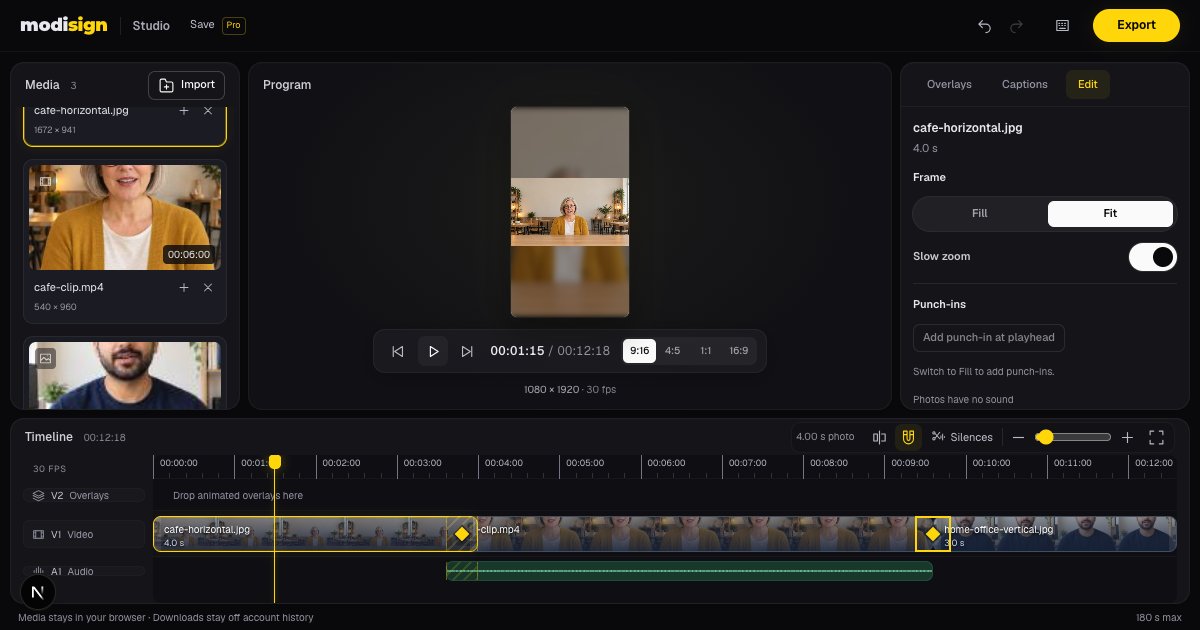
On October 14, 2026, we extended the opening photo from three to four seconds, switched it to Fit and enabled Slow zoom. A 0.4-second crossfade joined it to the video; Dip to black joined the video to the final photo. The downloaded 1080p MP4 contained 1080×1920 H.264 video at 30 fps and stereo AAC audio. Its 12.6-second duration matched the sequence after the crossfade overlap. Exported frames showed the blend and black frame at the second cut.
Have your own photos and clips ready before opening Studio. This walkthrough needs no paid overlays or captions. Modisign publishes this guide and sells Pro; we tested the assembly and download with a free account.
How do you combine the files, step by step?
- Import your photos and videos. Open Studio, sign in, then use Import or the file drop area. Our JPEG photos and H.264/AAC MP4 clips imported successfully. Studio also accepts PNG, WebP and AVIF photos; convert HEIC photos before importing them. Importing puts files in the Media bin; use each file’s plus button to add it to the timeline.
- Arrange the sequence and select 9:16. Add the files in the order you want, then drag timeline clips to reorder them. The Program monitor previews the chosen output aspect. Check every wide shot after selecting portrait output: a subject that fits a wide image can be cropped in a vertical frame.
- Set the photo durations. A newly added photo starts at three seconds. Drag its timeline edge to shorten or extend it; photos can last from 0.5 to 30 seconds each. In our test the first photo became four seconds while the last stayed at three. Allow enough time for a viewer to inspect the picture or read any title; three seconds is a starting point, not a rule.
- Choose Fill or Fit for each file. Select its V1 picture clip and open Edit. Fill covers the frame, cropping outside it; drag the picture in the Program monitor to reposition the crop and use Zoom if needed. Fit contains the whole image over a blurred, darker copy of it. Fit ignores the stored Fill zoom and pan. We used Fit for the wide café photo to keep the room visible and Fill for the portrait ending.
- Add photo motion where it helps. Turn on Slow zoom in the selected photo’s Edit panel. It gradually enlarges the picture by 8% over that photo’s duration and works in Fill or Fit. In Fit, the initially contained picture grows slightly, so inspect its final frame if every edge matters. Slow zoom is a photo setting; it does not add sound or animate a title.
- Choose the transitions at the cuts. Click the small transition control between adjacent V1 clips. Choose None, Crossfade or Dip to black, then set the duration from 0.2 to 1.0 seconds. Crossfade overlaps the two pictures and shortens the total; Dip passes through black without changing sequence length. Start with None, then add a transition only where its change in pace helps.
- Play through the sequence and export. Check the last moment of each photo, both sides of every cut and the audio when a video gives way to a photo. Click Export, select 1080p or 720p, then Export MP4. Both quality choices are free for this assembly. Play the downloaded file too; the timeline preview alone does not establish the finished result.
Which framing and transition should you choose?
| Choice | What happens | When to consider it |
|---|---|---|
| Fill | The frame is covered; the image may lose its edges | A portrait or detail shot where the subject fits the crop |
| Fit | The full starting image sits over a blurred, darker backdrop | A wide room, group or object whose edges matter |
| Slow zoom | A photo gradually enlarges by 8% | A held photo that benefits from a little movement |
| None | The next picture appears at the cut | A direct change of action or subject |
| Crossfade | Pictures overlap; the sequence becomes shorter | Two related images or a softer handoff |
| Dip to black | Picture and video audio fade through the cut without overlap | A clear break between sections |
If you already use another editor, the same assembly task can stay there. Clipchamp’s own guide documents arranging images and video clips together, adding a transition between them and adjusting its duration. We checked those instructions, but did not export this example in Clipchamp. Clipchamp’s slideshow transition guide.
What can go wrong with timing or sound?
A crossfade’s duration is limited by the clips on either side. Studio caps it at 45% of either clip and can shorten it after a trim; if it becomes shorter than 0.2 seconds, the transition is removed with a warning. Recheck the cut after trimming. Reordering or deleting clips also removes transitions at their affected edges.
Photos leave an empty gap on A1, the audio track. Our test sound played during the video and stopped for the photos. Studio does not invent music for that gap or carry a clip’s sound under the entire photo sequence. If continuous narration or a music bed is essential, plan that audio in an editor that supports the arrangement you need.
As a pacing suggestion, use a short photo to establish a place, show the action in video, then hold the result photo long enough to inspect it. A second option is a detail photo between two demonstrations. Watch those choices at normal speed before deciding whether either transition adds anything.
For an optional animated opening title, browse the Hook title overlays and choose a Free badge to keep the preset unchanged. An overlay is a visual layer above your footage. Custom wording or another Pro configuration changes the export entitlement; the photo and transition controls themselves remain free. Check text placement around platform controls before covering a face or image detail.
Studio’s sequence limit is 180 seconds. Keep the tab open until the download finishes: local media is not uploaded or restored after a reload. This desktop test did not cover a phone export, an Instagram upload or a full three-minute project. For the broader import, trim and download workflow, see editing a Reel online for free.
Frequently asked questions
Can I mix photos and video clips in the same Reel?
Yes. Add both to Studio’s timeline in the order you want, choose an output aspect and export one MP4. Our desktop test combined two JPEG photos with an H.264/AAC MP4.
How long can a photo last in Studio?
Photos start at three seconds and can be trimmed or extended from 0.5 to 30 seconds. The complete sequence has a 180-second limit.
Does Slow zoom work in Fit mode?
Yes. It enlarges the photo by 8% over its duration in Fill or Fit. In Fit, inspect the ending frame if keeping every edge visible matters.
Can I hear music throughout a photo sequence?
Photos have no sound and leave an empty audio-track gap. Studio does not generate music or extend a video’s audio under all the photos. Plan continuous audio in an editor that supports your required arrangement.
Is this workflow free?
Studio requires a free Google sign-in. Photo editing, these transitions and 1080p or 720p exports are free. Adding a Pro or customised overlay or expressive caption style makes that export require Pro.
Related reading
Sources and test details
Tested in Modisign Studio Local Modisign site, October 2026 on Desktop Chrome on macOS: On October 14, imported two JPEG creator illustrations and a six-second still-based H.264/AAC sample clip. Confirmed three-second default photo duration, extended the first to four seconds, used Fit with Slow zoom, and left the final portrait in Fill. Added a 0.4-second crossfade and a 0.4-second Dip to black. Downloaded a free 1080×1920 H.264/AAC MP4 at 30 fps: 378 frames and 12.6 seconds. Inspected the exported overlap and a black frame at the dip cut. A separate photo test verified Fill Slow zoom with a punch-in. No continuous music bed, phone export, platform upload or full 180-second project was tested.
Found an error or a changed control? support@modisign.app.