How to Add a Punch-In Zoom to a Talking-Head Video
By Modisign
- Published
- Updated
- Last tested
To add a punch-in zoom in Studio, select a video clip in Fill mode, place the playhead where the closer view should begin and click Add punch-in at playhead in Edit. Choose 110%, 125% or 140%, then set its length. The picture cuts closer and returns at the interval’s end; it does not glide between sizes or work in Fit mode.
What does the tested zoom look like?
A punch-in is a temporary tighter crop of the same shot. It can mark a change of thought or make a detail easier to inspect. Treat it as an editing choice for pacing, not a promise that viewers will stay longer.
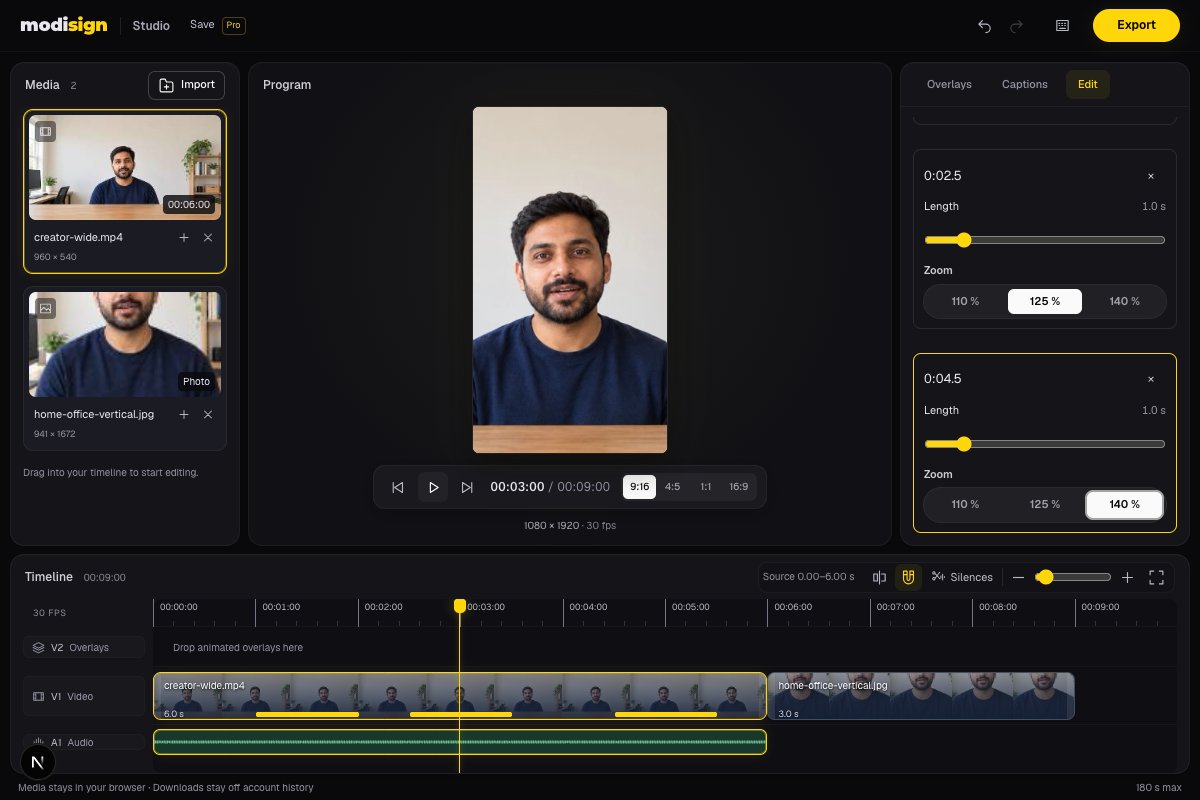
On October 14, 2026, our desktop Chrome test on macOS used a six-second wide sample video followed by a three-second portrait photo. Both show an AI-generated fictional creator; the video was made from a still illustration with test audio, not recorded speech. We added one-second zooms at 1.0, 2.5 and 4.5 seconds, using 110%, 125% and 140% respectively, plus a separate photo punch-in.
The downloaded MP4 contained 1080×1920 H.264 video at 30 fps, 270 frames over nine seconds, and stereo AAC audio. Comparing frames around each video interval showed the immediate closer crop and return to the original framing. Switching the selected clip to Fit disabled the punch-ins; Undo restored Fill. Adding again inside an existing interval selected its row instead of creating another.
Have a local video with room around the subject, a free Google sign-in and a desktop browser ready. Open Studio, import the clip and add it from Media to the timeline. This test used a free account without overlays or captions. Modisign publishes this guide and sells Pro.
How do you place a temporary zoom, step by step?
- Set the output aspect before framing. Choose 9:16 for this portrait example, then inspect the subject at the normal crop. A wide shot may already lose much of its background when it fills a vertical frame. The base view needs to work before you add a closer one.
- Select the V1 picture clip and open Edit. Choose Fill under Frame mode. The ordinary Zoom slider changes the clip’s base framing; the zoom choices inside a punch-in row apply only during that interval. In Fill, you can drag the image in the Program monitor to reposition the crop and use Reset to restore the base framing.
- Place the playhead at the start of the closer view. Seek inside the selected clip, ideally at a phrase or visual detail that deserves emphasis. Click Add punch-in at playhead. A new row starts there with a default 1.5-second length and 125% zoom. Its displayed start is relative to the clip, so a row beginning at 0:01.0 starts one second into that clip, not necessarily one second into the whole sequence.
- Choose the zoom strength. Select 110 %, 125 % or 140 % in that row. These enlarge the current Fill framing by those factors; they are additional to its base Zoom. Check the face, hands and anything you need to keep visible. A larger number can crop away the detail you intended to emphasise.
- Set the length and review both boundaries. The Length slider allows 0.5–4.0 seconds in 0.1-second steps, subject to room before the next punch-in. Our video example used one second for each. Play from before its start until after its end: the picture should cut closer, hold, then cut back while the source audio continues.
- Revisit the interval from V1. Its small accent bar at the bottom of the picture clip selects the corresponding row and scrolls the Edit panel to it. Adding at a playhead already inside an interval selects that existing row. Intervals cannot overlap. To remove one, use the × in its row; use Undo to reverse an edit you want to compare.
- Export and check the result at normal speed. Click Export, select 1080p or 720p, then Export MP4. These picture edits are free. If the framing is distracting in the downloaded file, shorten the hold, choose a smaller zoom or remove that interval. A correct export does not make every placement useful.
Which zoom should you try first?
| Choice | Relative enlargement | Suggested use to preview |
|---|---|---|
| 110% | 1.10 times the base Fill framing | A small emphasis with limited extra crop |
| 125% | 1.25 times the base framing; the default | A clear temporary close-up when the shot has room |
| 140% | 1.40 times the base framing | A detail that stays visible in a much tighter crop |
| Length | 0.5–4 seconds, default 1.5 seconds | Enough time for the selected phrase or detail |
For example, try a one-second closer view on the sentence that states the result, then return before the explanation. A second suggestion is a brief crop of a demonstrated object, provided the fixed crop centre keeps it in view. Compare the edit with no punch-in before choosing either.
Studio uses the clip’s existing pan centre. It does not track a moving face or let each row follow a different object. If the subject moves out of that tighter view, revise the base framing, choose a smaller factor or leave the shot wider.
Why is the button disabled, or a zoom missing?
| Problem | Check | Action |
|---|---|---|
| Add is disabled in Fit | The Edit panel says to switch to Fill | Choose Fill and review its crop first |
| Stored rows have no visible effect | Fit mode makes them inactive | Return to Fill if you want to use them |
| Add is disabled outside the clip | The playhead is before or after the selected V1 item | Move it inside that clip |
| A row says Outside trim | Its original start falls outside the retained source range | Review the trim or delete the inactive row |
| A length will not extend farther | The next interval leaves less room | Shorten this row or delete/recreate an interval at a different start |
Studio allows at most 50 punch-ins per clip. That is a limit, not a suggested editing pattern. Starts stay attached to source time through trims; trimming can leave an inactive row rather than moving it to a new sentence. Splitting assigns a row to the half that contains its start. After removing pauses, check the remaining intervals against the shortened sequence.
How is a punch-in different from Slow zoom?
A punch-in changes scale at its boundaries. Slow zoom gradually enlarges a photo across its duration; Studio’s photo setting works in Fill and Fit. Our separate photo test combined Slow zoom with a Fill punch-in, but using both is optional. For photo durations, framing and transitions, see making a Reel from photos and videos.
If you already edit in iMovie, Apple documents cropping a clip or photo to make a close-up. Its Ken Burns controls instead define a starting and ending crop for a gradual move. Those are useful alternative operations; we checked the documentation, not an iMovie version of this portrait export. Apple’s crop guide and Ken Burns guide.
A punch-in affects the underlying picture, not the size of an overlay title. If an opening title helps explain the shot, browse Hook title overlays after settling the crop and choose an unchanged Free preset. Custom wording or a Pro configuration changes the export requirement. Use the text safe-zone guide to check the title and captions separately.
Our test established the controls and exported crop boundaries on a still-based sample. It did not measure retention, test a moving human subject, upload to a platform or export on a phone. Keep the browser tab open through export; media lives in tab memory, and Studio’s sequence limit is 180 seconds.
Frequently asked questions
What punch-in zoom levels and lengths does Studio offer?
Choose 110%, 125% or 140% of the base Fill framing. Lengths run from 0.5 to 4 seconds in 0.1-second steps, constrained by the next interval. New rows default to 125% and 1.5 seconds.
Why does a punch-in disappear in Fit mode?
Punch-ins work only in Fill. Switching to Fit keeps existing rows but makes them inactive and disables adding and editing their zoom or length. Return to Fill to use them.
Can I change where a punch-in starts?
Add it at the desired playhead position. Rows expose length and zoom, not a separate start slider; to move one, delete it and add a new row at the new position.
Will punch-ins improve retention?
This test verified editing and exported crop changes, not audience retention. Use a closer view where it helps a phrase or detail, compare it with the original and judge the actual video.
Can I use punch-ins on photos too?
Yes, in Fill mode. Photos can also use Slow zoom, which gradually enlarges the image rather than making a temporary cut closer. Our test exported a photo with both settings.
Related reading
Sources and test details
- iMovie offers crop controls for making a close-up of a selected clip or photo. — accessed
- iMovie’s Ken Burns effect sets beginning and ending crops for an apparent gradual zoom. — accessed
Tested in Modisign Studio Local Modisign site, October 2026 on Desktop Chrome on macOS: On October 14, imported a six-second wide still-based creator sample video and a three-second creator photo. In 9:16 Fill, added one-second video punch-ins at 1.0, 2.5 and 4.5 seconds using 110%, 125% and 140%. Confirmed adding within an interval selects its existing row, Fit makes rows inactive, and Undo restores Fill. Added a default 125%, 1.5-second photo punch-in with Slow zoom. Downloaded a free 1080×1920 H.264/AAC MP4 at 30 fps, 270 frames over nine seconds. Checked exported frames immediately before, within and after all three video intervals: the crop changed at each boundary and returned to base framing. No moving human subject, retention measurement, phone export, platform upload or full 180-second sequence was tested.
Found an error or a changed control? support@modisign.app.